vue06
路由进阶
路由的封装剥离
如果关于路由的所有配置均写在main.js文件中是不合适的,将路由模块抽离出来,更利于后期的维护
具体操作
①抽取路由配置代码
新建src/router/index.js文件,在其中编写路由配置代码
②引入
在main.js文件中,引入路由对象并注入到vue实例
1
2
3
4
5
6
| import router from './router/index.js'
new Vue({
render:h=>h(App),
router
}).$mount("#app")
|
实例
router/index.js
1
2
3
4
5
6
7
8
9
10
11
12
13
14
15
16
17
18
| import VueRouter from "vue-router";
import Vue from "vue";
Vue.use(VueRouter)
import FindMusic from '@/views/FindMusic.vue'
import MyMusic from '../views/MyMusic.vue'
import MyFriend from '../views/MyFriend.vue'
const router = new VueRouter(
{
routes:[
{path:"/find",component:FindMusic},
{path:"/my",component:MyMusic},
{path:"/friend",component:MyFriend}
]
}
)
export default router
|
main.js
1
2
3
4
5
6
7
8
9
10
11
| import Vue from 'vue'
import App from './App.vue'
Vue.config.productionTip = false
import router from "./router/index.js"
new Vue({
render: h => h(App),
router
}).$mount('#app')
|
声明式导航—导航链接
vue-router提供了一个全局组件router-link,可以取代a标签,其与a标签相比的优势:
- 能跳转,配置
to属性指定路径,本质还是a标签,且路径前无需加#
- 能高亮,默认会提供高亮类名,可以之际设置高亮样式
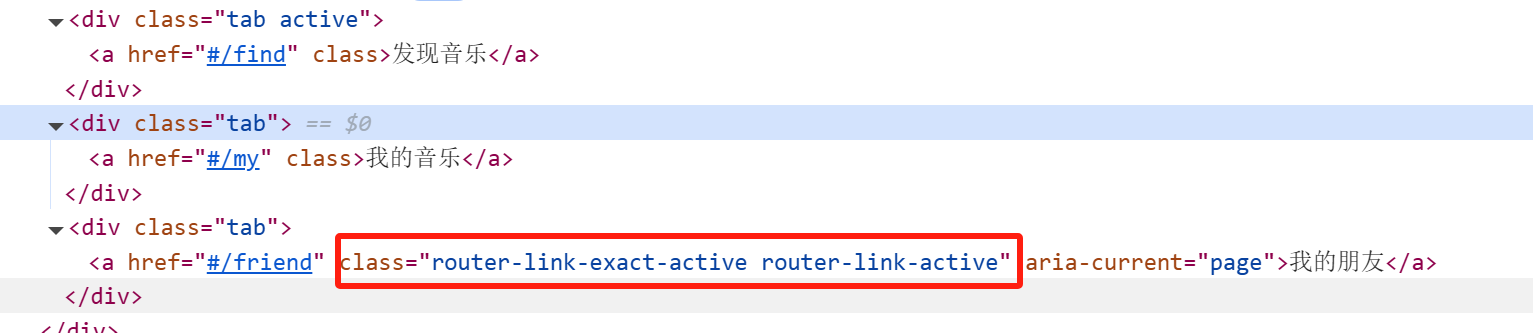
当前点击的tab,其会默认添加两个类名router-link-exact-active和router-link-active
1
2
3
4
5
6
7
8
9
10
11
12
13
14
15
16
17
18
19
20
21
22
23
24
25
26
27
28
29
30
31
32
33
34
35
36
37
38
39
40
41
42
43
44
45
46
47
48
49
50
51
52
53
54
| <template>
<div>
<div class="tab-container">
<!-- <div class="tab active"><a href="#/find">发现音乐</a></div>
<div class="tab"><a href="#/my">我的音乐</a></div>
<div class="tab"><a href="#/friend">朋友</a></div> -->
<div class="tab active">
<router-link to="/find">发现音乐</router-link>
</div>
<div class="tab"><router-link to="/my">我的音乐</router-link></div>
<div class="tab"><router-link to="/friend">我的朋友</router-link></div>
</div>
<div class="tab-content">
<router-view></router-view>
</div>
</div>
</template>
<script>
export default {};
</script>
<style>
.tab-container {
display: flex;
background-color: #333;
width: 60%;
margin: 30px auto;
}
.tab {
flex: 1;
padding: 10px;
text-align: center;
color: white;
cursor: pointer;
}
.active {
background-color: #444;
}
a {
all: unset;
}
.tab-content {
width: 60%;
font-size: 50px;
font-weight: 700;
color: red;
margin: 20px auto;
text-align: center;
}
.router-link-active {
background-color: rebeccapurple;
}
</style>
|
声明式导航—两个类名
router-link会自动给当前导航元素添加两个高亮类名router-link-exact-active和router-link-active,那么这两个类名有什么区别?
router-link-active 模糊匹配,用的比较多
to=/my可以匹配/my、/my/a、/my/b…- 即如果访问的链接为
/my/a,则/my对应的导航栏也会高亮
router-link-exact-active 精确匹配
自定义高亮类名
router-link自动添加的两个高亮类名比较长,如果我们希望能够定义类名怎么办?
可以在创建路由对象时,重新指定这两个类名的名称
1
2
3
4
5
| const router = new VueRouter({
routes:[],
linkActiveClass:"类名",
linkExactActiveClass:"类名"
})
|
声明式导航—跳转传参
在跳转路由时,进行传值
查询参数传参
语法格式
to="/path?参数名1=值1&参数名2=值2"
对应页面组件接收传递过来的值
$route.query.参数名
实例
src/router/index.js
1
2
3
4
5
6
7
8
9
10
11
12
13
| import VueRouter from "vue-router";
import Vue from "vue";
Vue.use(VueRouter)
import SearchPage from "@/views/SearchPage.vue";
const router = new VueRouter({
routes: [
{ path: "/search", component: SearchPage }
]
})
export default router
|
main.js
1
2
3
4
5
6
7
8
9
10
11
| import Vue from 'vue'
import App from './App.vue'
Vue.config.productionTip = false
import router from '@/router/index.js'
new Vue({
render: h => h(App),
router
}).$mount('#app')
|
App.vue
1
2
3
4
5
6
7
8
9
10
11
12
13
14
15
16
17
18
19
20
21
22
23
24
25
26
27
28
29
30
31
32
33
34
35
36
37
38
39
40
41
42
43
44
45
46
47
48
49
50
51
52
53
54
55
56
57
58
59
60
61
62
63
64
65
66
67
68
69
70
71
72
73
74
75
76
77
78
79
80
81
82
83
| <template>
<div>
<div class="header">
<div class="logo">
<img src="./assets/logohm.png" alt="Logo" width="50" height="50" />
<span>黑马程序员</span>
</div>
</div>
<div class="search-bar">
<input type="text" placeholder="请输入搜索内容" />
<input type="submit" value="搜索一下" />
</div>
<div class="hot-search">
热门搜索:
<router-link to="/search?words=黑马程序员">黑马程序员</router-link>
<router-link to="/search?words=前端培训">前端培训</router-link>
<router-link to="/search?words=如何成为前端大牛"
>如何成为前端大牛</router-link
>
</div>
<div class="content">
<router-view></router-view>
</div>
</div>
</template>
<script>
export default {};
</script>
<style>
body {
font-family: Arial, sans-serif;
width: 60%;
margin: 10px auto;
}
.header {
text-align: center;
margin-top: 20px;
}
.logo {
display: inline-block;
font-size: 24px;
font-weight: bold;
color: #333;
}
.search-bar {
text-align: center;
margin: 20px 0;
}
.search-bar input[type="text"] {
width: 60%;
padding: 10px;
font-size: 16px;
}
.search-bar input[type="submit"] {
padding: 10px 20px;
font-size: 16px;
background-color: #d9534f;
color: white;
border: none;
cursor: pointer;
}
.hot-search {
text-align: center;
margin-bottom: 20px;
}
.hot-search a {
margin: 0 5px;
color: #d9534f;
text-decoration: none;
border: 1px solid #d9534f;
padding: 5px 10px;
border-radius: 5px;
}
.content {
margin: 30px auto;
width: 40%;
text-align: center;
}
</style>
|
SearchPage.vue
1
2
3
4
5
6
7
8
9
10
11
12
13
| <template>
<div>
<h2>当前为所有总页面</h2>
<p>搜索的关键字:{{ $route.query.words }}</p>
</div>
</template>
<script>
export default {};
</script>
<style>
</style>
|
动态路由传参
配置动态路由
1
2
3
4
5
| const router = new VueRouter({
routes:[
{path:"/xxx/:参数名"}
]
})
|
配置导航链接
to="/path/参数值"
对应页面组件接收传递过来的值
$route.params.参数名
注意:path:"/xxx/:参数名"这种路由配置必须要传递对应的参数,如果不传参数,无法匹配,如果希望不传参数也能匹配,则可以加个可选符?,path:/xxx/:参数名?
实例
src/router/index.js
1
2
3
4
5
6
7
8
9
10
11
12
13
| import VueRouter from "vue-router";
import Vue from "vue";
Vue.use(VueRouter)
import SearchPage from "@/views/SearchPage.vue";
const router = new VueRouter({
routes: [
{ path: "/search/:words", component: SearchPage }
]
})
export default router
|
main.js
1
2
3
4
5
6
7
8
9
10
| import Vue from 'vue'
import App from './App.vue'
Vue.config.productionTip = false
import router from '@/router/index.js'
new Vue({
render: h => h(App),
router
}).$mount('#app')
|
App.vue
1
2
3
4
5
6
7
8
9
10
11
12
13
14
15
16
17
18
19
20
21
22
23
24
25
26
27
28
29
30
31
32
33
34
35
36
37
38
39
40
41
42
43
44
45
46
47
48
49
50
51
52
53
54
55
56
57
58
59
60
61
62
63
64
65
66
67
68
69
70
71
72
73
74
75
76
77
78
79
80
81
| <template>
<div>
<div class="header">
<div class="logo">
<img src="./assets/logohm.png" alt="Logo" width="50" height="50" />
<span>黑马程序员</span>
</div>
</div>
<div class="search-bar">
<input type="text" placeholder="请输入搜索内容" />
<input type="submit" value="搜索一下" />
</div>
<div class="hot-search">
热门搜索:
<router-link to="/search/黑马程序员">黑马程序员</router-link>
<router-link to="/search/前端培训">前端培训</router-link>
<router-link to="/search/如何成为前端大牛">如何成为前端大牛</router-link>
</div>
<div class="content">
<router-view></router-view>
</div>
</div>
</template>
<script>
export default {};
</script>
<style>
body {
font-family: Arial, sans-serif;
width: 60%;
margin: 10px auto;
}
.header {
text-align: center;
margin-top: 20px;
}
.logo {
display: inline-block;
font-size: 24px;
font-weight: bold;
color: #333;
}
.search-bar {
text-align: center;
margin: 20px 0;
}
.search-bar input[type="text"] {
width: 60%;
padding: 10px;
font-size: 16px;
}
.search-bar input[type="submit"] {
padding: 10px 20px;
font-size: 16px;
background-color: #d9534f;
color: white;
border: none;
cursor: pointer;
}
.hot-search {
text-align: center;
margin-bottom: 20px;
}
.hot-search a {
margin: 0 5px;
color: #d9534f;
text-decoration: none;
border: 1px solid #d9534f;
padding: 5px 10px;
border-radius: 5px;
}
.content {
margin: 30px auto;
width: 40%;
text-align: center;
}
</style>
|
SearchPage.vue
1
2
3
4
5
6
7
8
9
10
11
12
13
| <template>
<div>
<h2>当前为所有总页面</h2>
<p>搜索的关键字:{{ $route.params.words }}</p>
</div>
</template>
<script>
export default {};
</script>
<style>
</style>
|
查询参数传参 vs 动态路由传参
- 查询参数传参比较适合传多个参数
- 动态路由传参优雅简洁,适合传单个参数
路由重定向
重定向:匹配到某一个路径之后,强制跳转到另一个路径
语法:{path:匹配路径,redirect:重定向到的路径}
Vue路由—404
当路径找不到匹配时,给一个提示页面
语法:配在路由最后,{path:"*"(任意路径)},前面不匹配就命中最后这个
Vue路由—模式设置
背景:路由的路径看起来不自然,有#,能否切换成真正的路径形式
- hash路由(Vue默认),例如
http://localhost:8080/#/home
- history路由(常用),例如
http:localhost:8080/home
语法:
1
2
3
4
| const router = new VueRouter({
routes,
mode:"history"
})
|
编程式导航
基本跳转
点击按钮如何实现页面的跳转,比如场景:输入关键词,点击搜索按钮;点击登录按钮
编程式导航:用JS代码来进行跳转
常见两种实现方式:
path路径跳转
语法
1
2
3
4
5
| this.$router.push("路由路径")
或者完整写法
this.$router.push({
path:"路由路径"
})
|
实例
App.vue
1
2
3
4
5
6
7
8
9
10
11
12
13
14
15
16
17
18
19
20
21
22
23
24
25
26
27
28
29
30
31
32
33
34
35
36
37
38
39
40
41
42
43
44
45
46
47
48
49
50
51
52
53
54
55
56
57
58
59
60
61
62
63
64
65
66
67
68
69
70
71
72
73
74
75
76
77
78
79
80
81
82
83
84
85
86
87
88
89
90
91
92
| <template>
<div>
<div class="header">
<div class="logo">
<img src="./assets/logohm.png" alt="Logo" width="50" height="50" />
<span>黑马程序员</span>
</div>
</div>
<div class="search-bar">
<input type="text" placeholder="请输入搜索内容" v-model="queryWord" />
<input type="submit" value="搜索一下" @click="search" />
</div>
<div class="hot-search">
热门搜索:
<router-link to="/search/黑马程序员">黑马程序员</router-link>
<router-link to="/search/前端培训">前端培训</router-link>
<router-link to="/search/如何成为前端大牛">如何成为前端大牛</router-link>
</div>
<div class="content">
<router-view></router-view>
</div>
</div>
</template>
<script>
export default {
data() {
return {
queryWord: "",
};
},
methods: {
search() {
this.$router.push(`/search/${this.queryWord}`);
},
},
};
</script>
<style>
body {
font-family: Arial, sans-serif;
width: 60%;
margin: 10px auto;
}
.header {
text-align: center;
margin-top: 20px;
}
.logo {
display: inline-block;
font-size: 24px;
font-weight: bold;
color: #333;
}
.search-bar {
text-align: center;
margin: 20px 0;
}
.search-bar input[type="text"] {
width: 60%;
padding: 10px;
font-size: 16px;
}
.search-bar input[type="submit"] {
padding: 10px 20px;
font-size: 16px;
background-color: #d9534f;
color: white;
border: none;
cursor: pointer;
}
.hot-search {
text-align: center;
margin-bottom: 20px;
}
.hot-search a {
margin: 0 5px;
color: #d9534f;
text-decoration: none;
border: 1px solid #d9534f;
padding: 5px 10px;
border-radius: 5px;
}
.content {
margin: 30px auto;
width: 40%;
text-align: center;
}
</style>
|
name命名路由跳转
该方式适用于path路径长的场景
语法
1
| {name:"路由名",path:"路径",component:"对应的组件名称"}
|
1
2
3
| this.$router.push({
name:路由名
})
|
编程式导航—路由传参
背景:点击搜索按钮,跳转时传参如何实现?
path路径跳转传参
查询参数传参
1
2
3
4
5
6
7
8
9
| this.$router.push("路径?参数名1=参数值1&参数名2=参数值2")
或者完整的写法
this.$router.push({
path:"路径",
query:{
参数名1:参数值1,
参数名2:参数值2
}
})
|
对应页面接收参数:$route.query.参数名
动态路由传参
1
2
3
| this.$router.push("/路径/参数值")
或者完整写法
this.$router.push("/路径/参数值")
|
对应页面接收参数:$route.params.参数名
name命名路由跳转传参
查询参数传参
1
2
3
4
5
6
7
| this.$router.push({
name:"路由名字",
query:{
参数名1:"参数值1",
参数名2:"参数值2"
}
})
|
动态路由传参
1
2
3
4
5
6
| this.$router.push({
name:"路由名字",
params:{
参数名:"参数值"
}
})
|
嵌套路由
在一级路由里面嵌套二级路由
语法
1
2
3
4
5
6
7
8
9
10
11
| const router = new VueRouter({
routes:[
{
path:"一级路由路径",
component:对应的组件,
children:[//在children中配置二级路由
{path:二级路由路径,component:对应的组件}
]
}
]
})
|
注意:为了能够展示二级路由页面,在一级路由页面中也要配置路由出口<router-view></router-view>
组件缓存 keep-alive
在列表页,点击一个进入对应详情页,点击返回,混动条自动切换到了最开头的位置,原来点击的位置看不到了,这样用户体验不好
背景:从面经点到详情页,又点返回,数据重新加载了,但是希望能够回到原来的位置
原因:路由跳转之后,组件被销毁了,返回回来的组件又被重建了,所以数据重新被加载了
解决方案:利用keep-alive将组件缓存下来
keep-alive
keep-alive是Vue内置组件,当它包裹动态组件时,会缓存不活动的组件实例,而不是销毁它们
keep-alive时一个抽象组件,它自身不会渲染成一个DOM元素,也不会出现在父组件链中
keep-alive优势
- 在组件切换过程中,把切换出去的组件保留在内存中,防止重复渲染dom
- 减少加载时间以及性能消耗,提高用户体验性
语法
1
2
3
| <keep-alive>
<router-view></router-view>
</keep-alive>
|
keep-alive默认会缓存所有的组件,但是可以通过配置属性值来对其进行控制
keep-alive三个属性
- include:组件名数组,只有匹配的组件才会被缓存
- exclude:组件名数组,任何匹配的组件都不会被缓存
- max:最多可以缓存多少组件实例
1
2
3
| <keep-alive :include="['组件名']">
<router-view></router-view>
</keep-alive>
|
补充
keep-alive缓存的组件会增加两个生命周期钩子函数
actived:激活时,组件被看到时会被触发deactived:失活时,离开页面组件看不见时触发
因为组件一旦被缓存,就不会执行组件的created、mounted和destroyed函数
常规项目实现基本步骤
- 配置路由
- 实现具体页面的功能
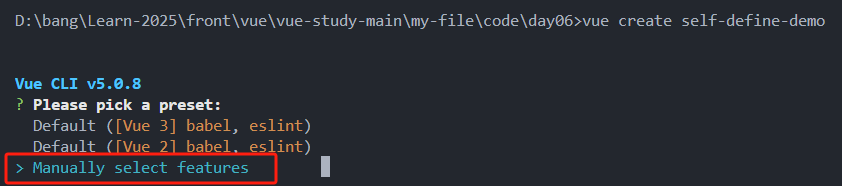
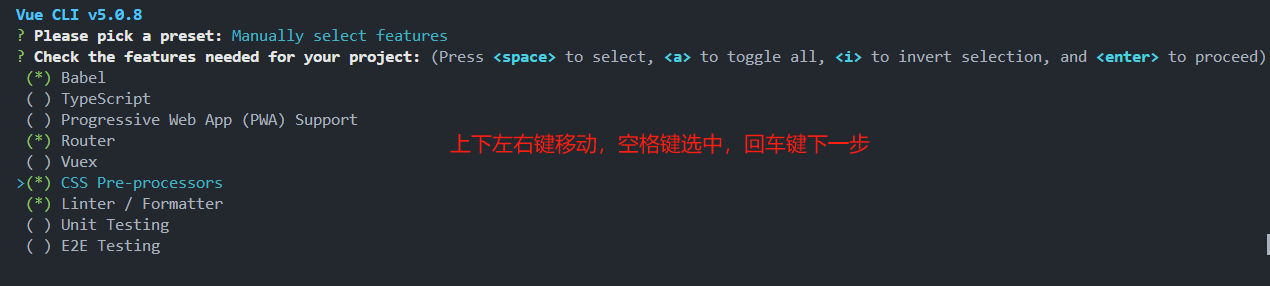
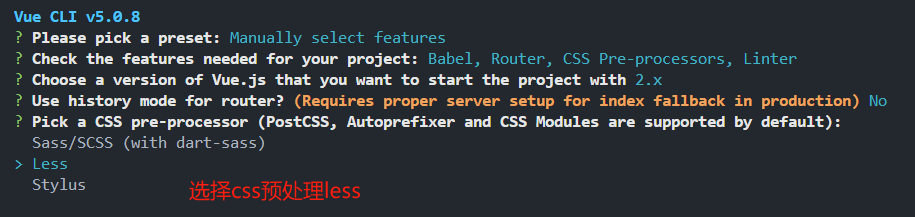
自定义创建项目
基于VueCli自定义创建项目架子,前面使用路由时,需要手动导包、注册、创建路由实例、注入vue对象,步骤比较繁琐
本节介绍如何自定义创建项目架子
步骤
1
2
| graph LR
安装脚手架-->创建项目-->选择自定义-->Babel/Router/CSS/Linter
|


ESlint代码规范
代码规范
代码规范即一套写代码的约定规则,例如赋值符号的左右是否需要空格,一句话结束是否需要加;
Vue代码常用的规范:JavaScript Standard Style规范
代码规范错误
如果编写的代码不符合standard的要求,ESlint会进行错误提示
解决代码规范错误
手动修正
根据错误提示一项一项手动去修改纠正
如果不认识命令行中的语法报错的含义,可以根据错误代码去 ESlint规则表查找具体含义
自动修正
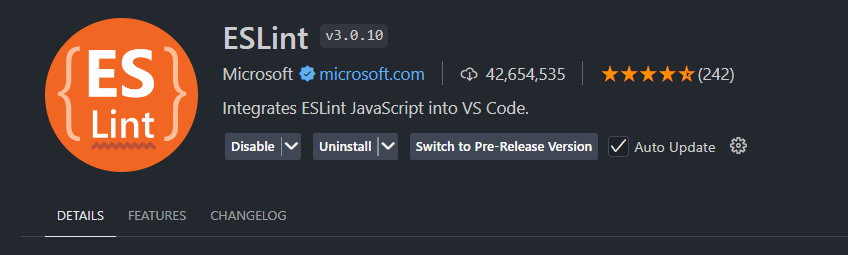
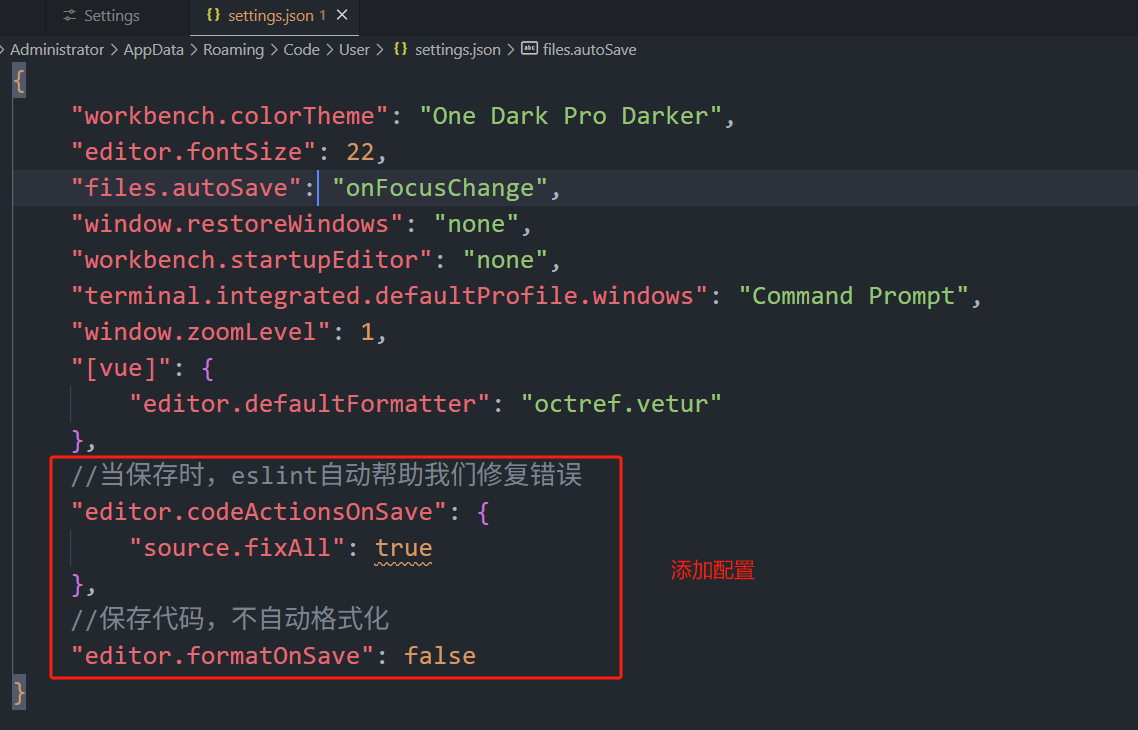
基于vscode插件ESLint高亮错误,并通过配置自动帮助我们修复错误
添加配置,使得文件保存时,ESlint自动帮我们修复错误
1
2
3
4
5
6
|
"editor.codeActionsOnSave": {
"source.fixAll": true
},
"editor.formatOnSave": false
|
 微信
微信 支付宝
支付宝