vue3入门
vue3介绍
vue3官方文档
与vue2相比,vue3的优势:
- 实现同样功能,所需的代码量变少了
- 分散式维护转为集中式维护
create-vue
create-vue是一个基于 Vite 的 Vue 3 项目脚手架工具,由 Vue.js 核心团队成员和社区贡献者开发。它旨在提供更快的开发体验和更现代化的项目结构。create-vue 专注于 Vue 3,并且与 Vite 集成,提供了更快速的热重载和构建性能。
使用create-vue创建项目
前提条件
已经安装16.0或者更高版本的NodeJs
创建一个vue应用
这一指令会自动安装并执行create-vue,让后根据命令行提示输入项目名、各种配置即可
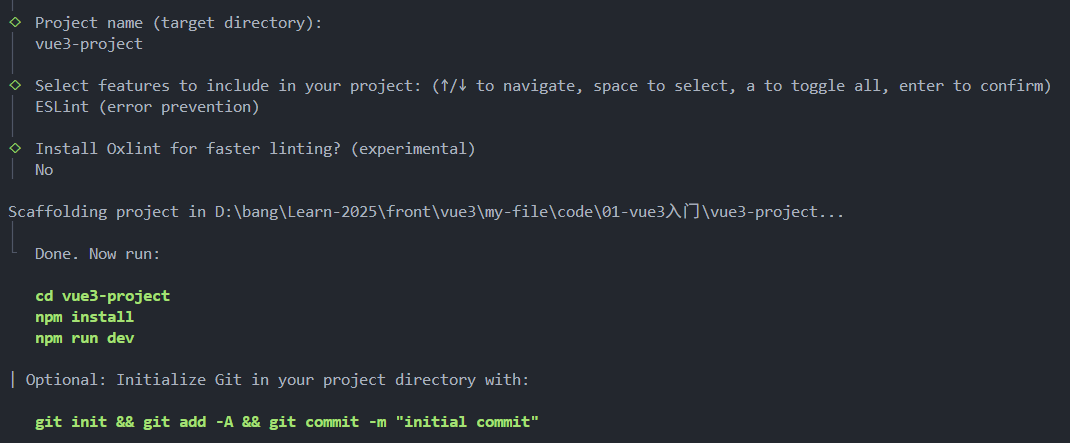
启动项目
1
2
3
4
5
6
| #切换到项目目录
cd 项目名
#安装依赖
npm install
#启动项目
npm run dev
|
vue3项目目录和关键文件
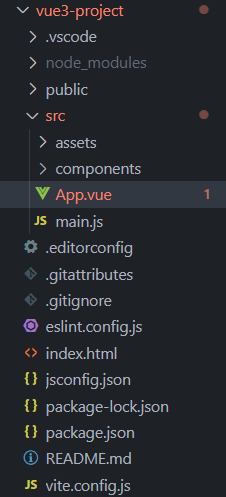
关键文件
vite.config.js:项目的配置文件,基于vite的配置package.json:项目包文件,核心依赖项变成了Vuex3.x和vitemain.js:入口文件,利用createApp函数创建应用实例app.vue:根组件,script-template-style,其余vue2相比的变化:
- 脚本
script和模板template顺序调整
- 模板
template不再要求唯一根元素
- 脚本
script添加setup标识支持组合式API
index.html:单页入口,提供id为app的挂载点
组合式API—setup
setup函数的写法
1
2
3
4
5
6
7
8
| export default {
setup(){
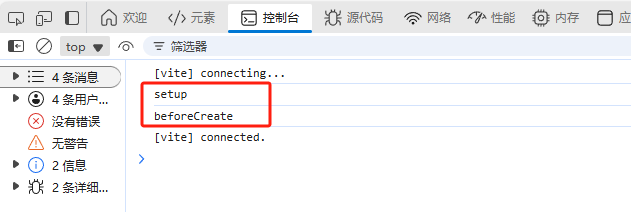
console.log("setup")
},
beforeCreate(){
console.log("beforeCreate")
}
}
|
setup函数先于beforeCreate函数执行
setup里面可以定义数据和函数,需要以对象方式用return进行返回,但是这样写法就比较复杂,所以vue3提供了语法糖的形式
原始复杂写法
1
2
3
4
5
6
7
8
9
10
11
12
13
14
15
16
17
18
19
20
21
| <template>
<div>{{ message }}</div><br/>
<button @click="logMessage">logMessage</button>
</template>
<script>
export default {
setup(){
const message = "this is vue3 message"
const logMessage = ()=>console.log("logMessage")
return {
message,
logMessage
}
}
}
</script>
<style>
</style>
|
语法糖写法
1
2
3
4
5
6
7
8
9
10
11
12
13
| <template>
<div>{{ message }}</div><br/>
<button @click="logMessage">logMessage</button>
</template>
<script setup>
const message = "this is vue3 message"
const logMessage = ()=>console.log("logMessage")
</script>
<style>
</style>
|
通过<script setup></script>语法糖的封装可以更简单的使用组合式API
组合式API—reactive和ref函数
reactive
reactive接受对象类型数据的参数传入并返回一个响应式的对象
核心步骤
1
2
3
4
5
6
| <script setup>
//导入
import { reactive } from 'vue'
//执行函数 传入对象参数 返回响应对象
const state = reactive(对象类型数据)
</script>
|
实例
1
2
3
4
5
6
7
8
9
10
| <script setup>
import { reactive } from 'vue';
const data = reactive({"count":0})
const addCount = ()=>data.count+=1
</script>
<template>
<button @click="addCount">{{ data.count }}</button>
</template>
<style scoped>
</style>
|
ref
ref函数接收简单类型或者对象类型的数据,传入并返回一个响应式的对象
核心步骤
1
2
3
4
5
6
| <script setup>
//导入
import { ref } from 'vue'
//执行函数 传入参数 返回响应式数据
const state = ref(简单类型或者复杂类型数据)
</script>
|
实例
1
2
3
4
5
6
7
8
9
10
11
| <script setup>
import { ref } from 'vue';
const data = ref({"count":0})
const addCount = ()=>data.value.count+=1
</script>
<template>
<button @click="addCount">{{ data.count }}</button>
</template>
<style scoped>
</style>
|
注意:脚本区域修改ref产生的响应式对象数据,必须通过.value属性
computed计算属性函数
vue3中的计算属性的基本思想和vue2的完全一致,组合式API下的计算属性只是修改了写法
核心步骤
1
2
3
4
5
6
7
8
| <script setup>
//1.导入
import { computed } from 'vue'
//2.执行函数
const computedState = computed(()=>{
return 基于响应式数据做计算之后的值
})
</script>
|
实例
1
2
3
4
5
6
7
8
9
10
11
12
13
14
15
| <script setup>
import { ref } from 'vue'
import { computed } from 'vue';
const list = ref([1,2,3,4,5,6,7,8,9,10])
const filterList = computed(()=>{
return list.value.filter((n)=>n%2==0)
})
//校验list值发生变化之后,计算属性值是否会相应变化
setTimeout(()=>list.value.push(10,12),1000)
</script>
<template>
<div>过滤之前:{{ list }}</div><br/>
<div>过滤之后:{{ filterList }}</div>
</template>
|
watch函数
watch函数是监听一个或者多个数据的变化,数据变化时执行回调函数
两个额外的参数:
监听单个数据
1
2
3
4
5
6
7
8
9
| <script setup>
//导入
import { watch,ref } from 'vue'
const count = ref(0)
//调用watch监听变化
watch(count,(newValue,oldValue)=>{
console.log(`count的值发生了变化,原来的值${oldValue},现在的值为${newValue}`)
})
</script>
|
监听多个数据
同时监听多个响应式数据的变化,不管哪个数据变化都需要执行回调
1
2
3
4
5
6
7
8
9
| <script setup>
import { ref,watch } from 'vue'
const count = ref(0)
const name = ref("zs")
//监听多个数据源
watch([count,name],([newCount,newName],[oldCount,oldName])=>{
console.log(`count或者name的值发生了变化,原来的值为:[${oldCount},${oldName}],现在的值为:[${newCount},${newName}]`)
})
</script>
|
在监听器创建时,立即触发回调,响应式数据变化之后继续执行回调
适用场景:比如下来列表,还有选择时,即会触发对应操作,比如向后端发送请求
1
2
3
4
5
6
7
8
| <script setup>
import { ref,watch } from 'vue'
const count = ref(0)
const name = ref('zs')
watch([count,name],([newCount,newName],[oldCount,oldName])=>{
console.log(`count或者name的值发生了变化,原来的值:[${oldCount},${oldName}],现在的值:[${newCount},${newName}]`)
},{immediate:true})
</script>
|
deep
通过watch监听的ref对象默认都是浅层监听的,直接修改嵌套的对象属性不会触发回调执行,需要开启deep选项
1
2
3
4
5
6
7
8
9
10
| <script setup>
import { ref,watch } from 'vue'
const people = ref({
name:"zs",
age:27
})
watch(people,(newValue,oldValue)=>{
console.log(`people的值发生了变化,变化之前的值:${oldValue},变化之后的值:${newValue}`)
},{deep:true})
</script>
|
精确监听
开启deep之后,对象中任意属性变化,都会触发
如何在不开启deep前提下,监听对象的某个属性的变化?
1
2
3
4
5
6
7
8
9
10
11
12
| <script setup>
import { ref,watch } from 'vue'
const people = ref({
name:"zs",
age:27
})
//第一个参数为需要监听的特定属性
watch(
()=>people.value.age,
(newValue,oldValue)=>console.log(`age的值发生了变化,原来的值为${oldValue},现在的值为:${newValue}`)
)
</script>
|
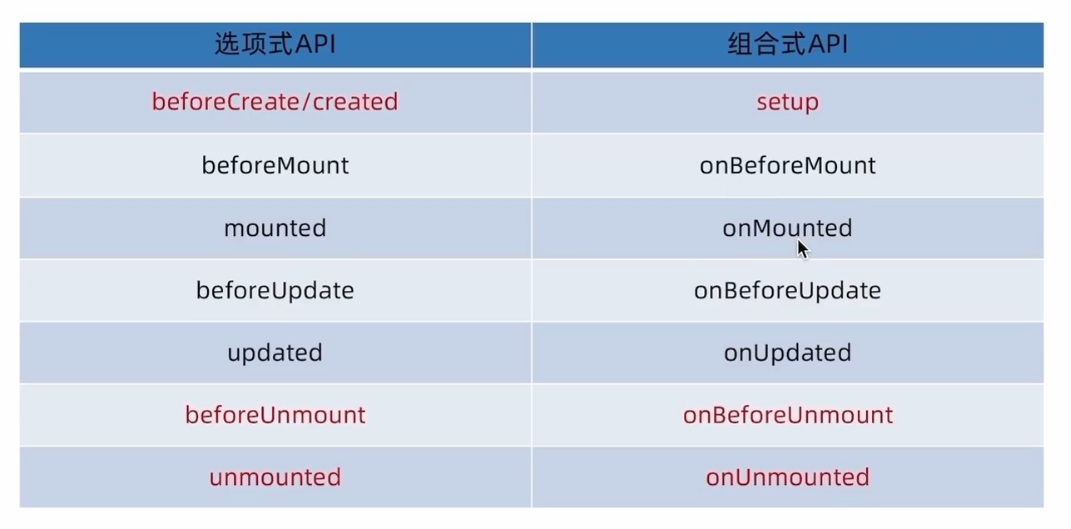
生命周期函数
vue3的生命周期API 选项式 vs 组合式
语法
- 导入对应的生命周期函数
- 执行生命周期函数 传入对应的回调逻辑
生命周期函数是可以执行多次的,多次执行时传入的回调会在时机成熟时依次执行
1
2
3
4
5
6
7
8
9
| <script setup>
import { onMounted } from 'vue';
onMounted(()=>{
console.log("onMounted1")
})
onMounted(()=>{
console.log("onMounted2")
})
</script>
|
组合式API—父子通信
父传子
基本思想
- 父组件中给子组件绑定属性
- 子组件内部通过
defineProps接收
父组件App.vue
1
2
3
4
5
6
7
8
9
10
11
12
13
| <script setup>
import SonPage from './components/SonPage.vue';
import { ref } from 'vue'
const count = ref(666)
setTimeout(()=>{
count.value+=1
},1000)
</script>
<template>
<h2>父组件</h2><br>
<!-- 父组件给子组件绑定属性 -->
<SonPage :count="count" message="父组件传来的数据"></SonPage>
</template>
|
子组件Son.vue
1
2
3
4
5
6
7
8
9
10
11
12
13
| <script setup>
const props = defineProps({
message:String, //指定数据类型,
count:Number
})
console.log(props)
</script>
<template>
<div>
<h2>子组件</h2>
<p>{{ message }}-- {{ count }}</p>
</div>
</template>
|
子传父
基本思想
- 父组件给子组件标签通过
@绑定事件
- 子组件内部通过
emit方法触发事件
父组件App.vue
1
2
3
4
5
6
7
8
9
| <script setup>
import SonPage from './components/SonPage.vue';
const logMessage = (message)=>{
console.log(message)
}
</script>
<template>
<SonPage @send-message="logMessage"></SonPage>
</template>
|
子组件SonPage.vue
1
2
3
4
5
6
7
8
9
10
11
12
| <script setup>
//通过defineEmits宏函数生成emit方法
//参数为数组,可以一次性传入当前组件所有自定义的事件
const emit = defineEmits(["send-message"])
//emit方法触发对应的事件
const sendMessage = ()=>{
emit("send-message","从子组件传来的数据")
}
</script>
<template>
<button @click="sendMessage">子传父</button>
</template>
|
组合式API—模板引用
通过ref标识获取真实的dom对象或者组件实例对象
语法
- 调用
ref函数生成一个ref对象
- 通过
ref表示绑定ref对象到标签
- 在组件挂载完毕之后通过
ref对象.value获取对应的dom对象
1
2
3
4
5
6
7
8
9
10
11
| <script setup>
import { ref,onMounted } from 'vue'
const divRef = ref(null)
//组件挂载完毕之后才能获取对应的dom
onMounted(()=>{
console.log(divRef.value.innerText)
})
</script>
<template>
<div ref="divRef">ref绑定的元素</div>
</template>
|
子组件的模板引用
默认情况下在<script setup>语法糖下组件内部的属性和方法是不开放给父组件访问的,可以通过defineExpose编译宏指定哪些属性和方法是允许访问的
1
2
3
| defineExpose({
属性名/方法名
})
|
实例
父组件App.vue
1
2
3
4
5
6
7
8
9
10
11
12
13
14
| <script setup>
import { ref,onMounted } from 'vue'
import SonPage from './components/SonPage.vue'
const sonRef = ref(null)
//组件挂载完毕之后才能获取对应的dom
onMounted(()=>{
console.log(sonRef.value)
console.log(sonRef.value.name)
sonRef.value.logMsg()
})
</script>
<template>
<SonPage ref="sonRef">子组件</SonPage>
</template>
|
子组件SonPage.vue
1
2
3
4
5
6
7
8
9
10
11
12
13
14
15
| <script setup>
import { ref } from 'vue';
const name = ref("zs")
const logMsg = ()=>{
console.log("logMsg")
}
//通过defineExpose编译宏指定允许访问的属性和方法
defineExpose({
name,
logMsg
})
</script>
<template>
</template>
|
组合式API—provide和inject
作用和应用场景:顶层组件向任意的底层组件传递数据和方法,实现跨层组件通信
传递普通数据
核心步骤:
1.顶层组件通过provide函数提供数据
1
| provide('key',顶层组件中的数据);//第一个参数为标识,第二个参数为对应的值
|
2.底层组件通过inject函数获取数据
1
2
| //通过标识获取对应数据
const data = inject('key')
|
传递响应式数据
1.顶层组件通过provide函数提供数据
1
| provide('key',ref对象);//第一个参数为标识,第二个参数为对应的ref对象
|
2.底层组件通过inject函数获取数据
1
2
| //通过标识获取对应数据
const data = inject('key')
|
跨层传递方法
由于数据是单向传递,底层组件无法直接修改顶层组件传递的数据,但是顶层组件可以向底层组件传递方法,底层组件调用方法来修改顶层组件中的数据
开发时遵循的原则:谁的数据谁复杂修改
1.顶层组件
2.底层组件
 微信
微信 支付宝
支付宝