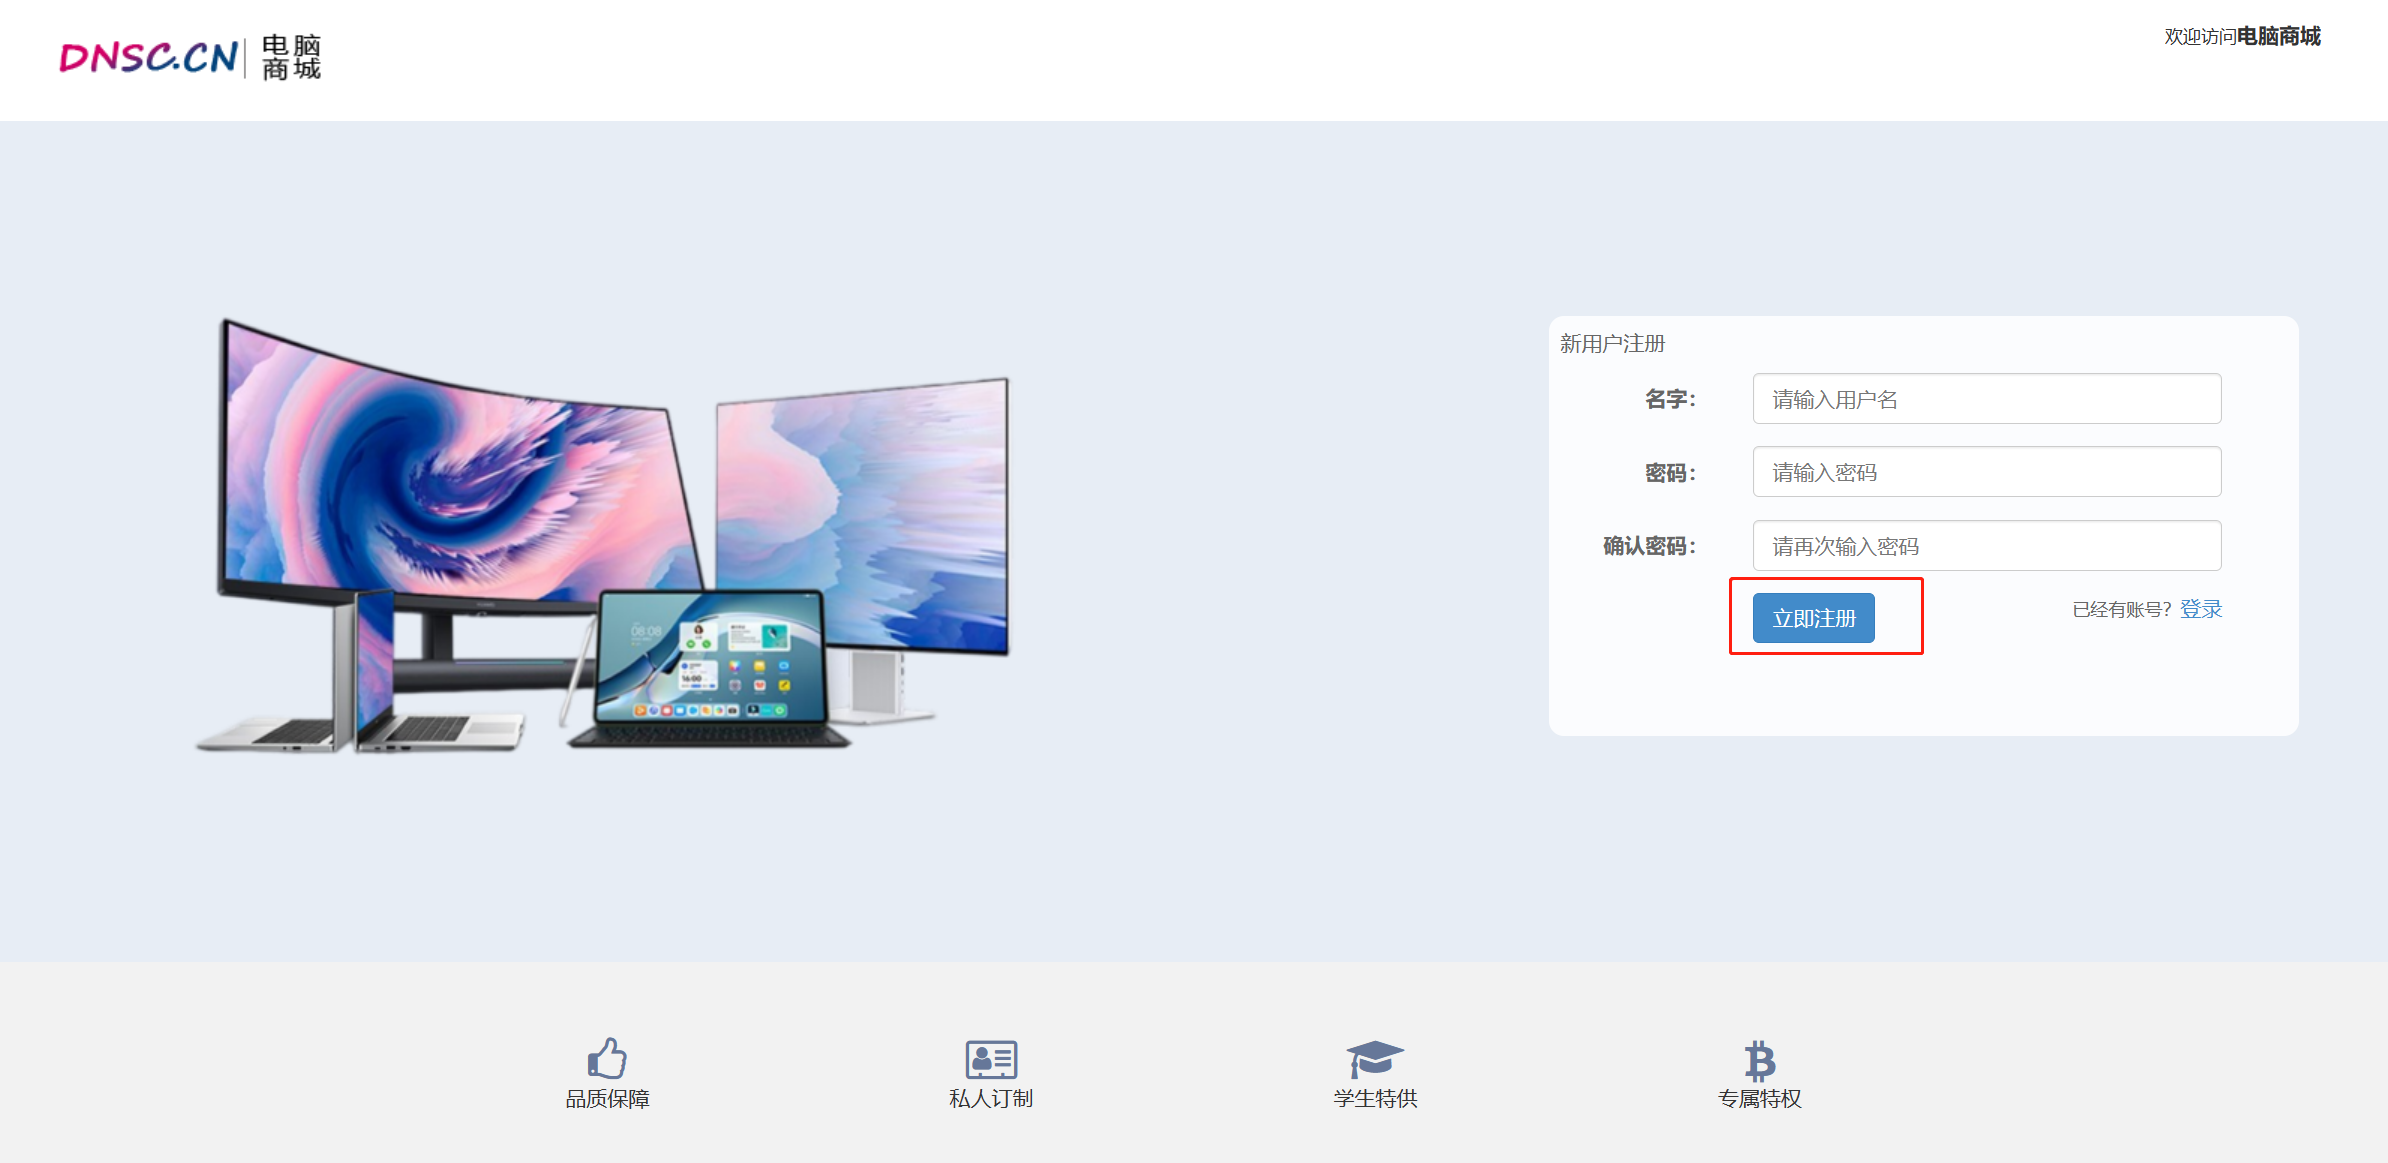
用户注册
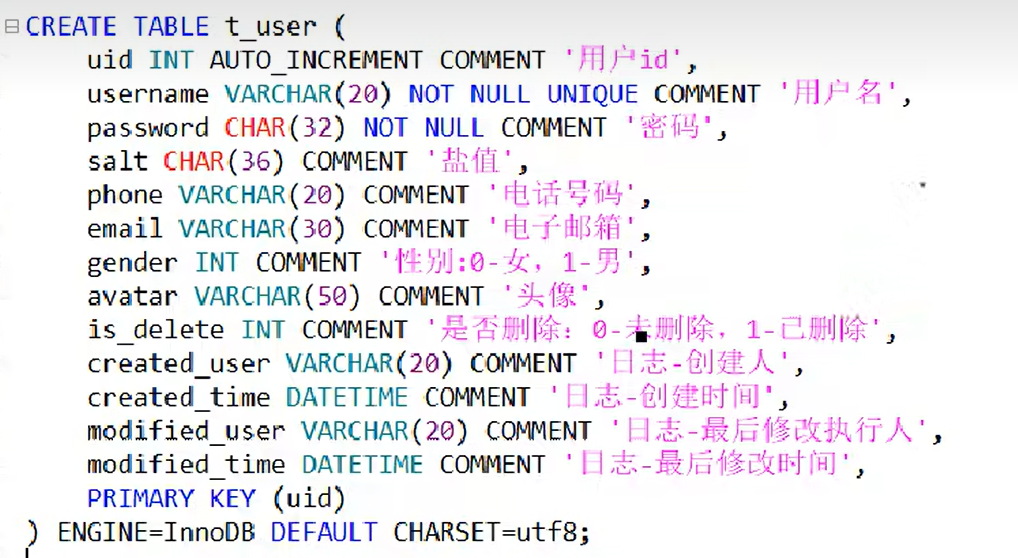
创建数据库
用户表
创建用户的实体类
实体类的包名规定:com.bang.store.pojo
数据表公共字段抽取
数据库设计过程中,多个业务数据表均存在以下公共字段,则可以将公共字段抽象成一个新的基类com.bang.store.BasePojo,供各个数据库表使用
1
2
3
4
| created_user VARCHAR(20) COMMENT '日志-创建人',
created_time DATETIME COMMENT '日志-创建时间',
modified_user VARCHAR(20) COMMENT '日志-最后修改执行人',
modified_time DATETIME COMMENT '日志-最后修改时间',
|
java基类
1
2
3
4
5
6
7
8
9
10
11
12
13
14
15
16
17
18
19
20
21
22
23
24
25
26
27
28
29
30
31
32
33
| package com.bang.store.pojo;
import lombok.AllArgsConstructor;
import lombok.Data;
import lombok.NoArgsConstructor;
import java.io.Serializable;
import java.util.Date;
import java.util.Objects;
@Data
@NoArgsConstructor
@AllArgsConstructor
public class BasePojo implements Serializable {
private String createdUser;
private Date createdTime;
private String modifiedUser;
private Date modifiedTime;
@Override
public boolean equals(Object o) {
if (this == o) return true;
if (o == null || getClass() != o.getClass()) return false;
BasePojo basePojo = (BasePojo) o;
return Objects.equals(createdUser, basePojo.createdUser) && Objects.equals(createdTime, basePojo.createdTime) && Objects.equals(modifiedUser, basePojo.modifiedUser) && Objects.equals(modifiedTime, basePojo.modifiedTime);
}
@Override
public int hashCode() {
return Objects.hash(createdUser, createdTime, modifiedUser, modifiedTime);
}
}
|
补充说明
用户实体类创建
1
2
3
4
5
6
7
8
9
10
11
12
13
14
15
16
17
18
19
20
21
22
23
24
25
26
27
28
29
30
31
32
33
34
35
36
37
38
39
40
| package com.bang.store.pojo;
import lombok.AllArgsConstructor;
import lombok.Data;
import lombok.NoArgsConstructor;
import java.util.Objects;
@Data
@NoArgsConstructor
@AllArgsConstructor
public class User extends BasePojo{
private Integer uid;
private String username;
private String password;
private String salt;
private String phone;
private String email;
private Integer gender;
private String avatar;
private Integer isDelete;
@Override
public boolean equals(Object o) {
if (this == o) return true;
if (o == null || getClass() != o.getClass()) return false;
if (!super.equals(o)) return false;
User user = (User) o;
return Objects.equals(uid, user.uid) && Objects.equals(username, user.username) && Objects.equals(password, user.password) && Objects.equals(salt, user.salt) && Objects.equals(phone, user.phone) && Objects.equals(email, user.email) && Objects.equals(gender, user.gender) && Objects.equals(avatar, user.avatar) && Objects.equals(isDelete, user.isDelete);
}
@Override
public int hashCode() {
return Objects.hash(super.hashCode(), uid, username, password, salt, phone, email, gender, avatar, isDelete);
}
}
|
持久层
数据访问层,主要是通过mybatis操作数据库
需要执行的SQL语句的设计
用户注册,通常需要输入用户名和密码这两个字段,相当于数据库的插入过程
1
| insert into t_user(username,password) values(值列表)
|
用户注册时,还应该判断当前用户名是否被注册过了,如果用户名已存在,则无法进行注册,需要用户重新输入用户名,这个过程本质是相当于一条查询语句
1
| select * from t_user where username=?;
|
设计接口和抽象方法
Mapper接口方法
整个项目存在多个Mapper接口,需要在当前包目录结构下创建一个mapper包,在该包下根据功能模块创建对应的Mapper接口。
- 创建
UserMapper接口,实现与3.1中两条SQL语句对应的接口
1
2
3
4
5
6
7
8
9
10
11
12
13
14
15
16
17
18
19
20
21
22
23
| package com.bang.store.mapper;
import com.bang.store.pojo.User;
public interface UserMapper {
Integer insert(User user);
User findByUsername(String username);
}
|
在项目启动类中添加注解@MapperScan,指明Mapper接口路径,避免在每个接口类中都要添加注解@Mapper
1
2
|
@MapperScan("com.bang.store.mapper")
|
编写映射
Mybatis的映射文件xxMapper.xml的编写,与对应的接口相关联
映射文件都需要放置在resources文件夹下,为便于管理,可以新建一个mapper文件夹,在该文件夹下再创建不同功能模块的映射文件,注意各个映射文件的命名要与对应接口的命名保持一致
创建UserMapper.xml文件
1
2
3
4
5
6
7
8
9
10
11
12
13
14
15
16
17
18
19
20
21
22
23
24
25
26
27
28
29
30
31
32
33
34
35
36
37
38
39
40
41
42
43
44
45
46
47
| <?xml version="1.0" encoding="UTF-8" ?>
<!DOCTYPE mapper
PUBLIC "-//mybatis.org//DTD Mapper 3.0//EN"
"https://mybatis.org/dtd/mybatis-3-mapper.dtd">
<mapper namespace="com.bang.store.mapper.UserMapper">
<resultMap id="UserPojoMap" type="com.bang.store.pojo.User">
<id property="uid" column="uid"/>
<result property="idDelete" column="is_delete"/>
<result property="createUser" column="create_user"/>
<result property="createTime" column="create_time"/>
<result property="modifiedUser" column="modified_user"/>
<result property="modifiedTime" column="modified_time"/>
</resultMap>
<insert id="insert" useGeneratedKeys="true" keyProperty="uid" parameterType="com.bang.store.pojo.User">
insert into t_user(username,password,salt,phone,email,gender,avatar,is_delete,created_user,created_time,modified_user,modified_time) values(
#{username},#{password},#{salt},#{phone},#{email},#{gender},#{avatar},#{isDelete},#{createdUser},#{createdTime},#{modifiedUser},#{modifiedTime});
</insert>
<select id="findByUsername" parameterType="String" resultMap="UserPojoMap">
select * from t_user where username=#{username};
</select>
</mapper>
|
Mybatis配置文件
Spring里面会有一个Mybatis Config.xml文件,在配置文件里会指定mapper映射文件的位置,SpringBoot里可以省去这个文件
但是需要在配置文件application.yml里要指明
1
2
| mybatis:
mapper-locations: classpath:mapper/*.xml
|
单元测试
每一个部分功能模块编写完成之后。都需要进行专门的功能测试
1
2
3
4
5
6
7
8
9
10
11
12
13
14
15
16
17
18
19
20
21
22
23
24
25
26
27
28
29
30
31
| package com.bang.store.mapper;
import com.bang.store.pojo.User;
import org.junit.Test;
import org.junit.runner.RunWith;
import org.springframework.boot.test.context.SpringBootTest;
import org.springframework.test.context.junit4.SpringRunner;
import javax.annotation.Resource;
@SpringBootTest
@RunWith(SpringRunner.class)
public class UserMapperTest {
@Resource
private UserMapper userMapper;
@Test
public void insert(){
User user = new User();
user.setUsername("李白");
user.setPassword("li123456");
Integer insert = userMapper.insert(user);
System.out.println(insert);
}
@Test
public void findByUsernameTest(){
User user = userMapper.findByUsername("张飞");
System.out.println(user);
}
}
|
业务层
业务层与实际应用场景相挂钩
常见包目录结构
- service
- ex:异常类
- impl:接口文件对应的实现类
- 接口文件
异常规划
结合用户使用具体场景,设计对应的异常
在实际项目中,异常要进行分级,各个具体问题要建立自定义的异常
比如:业务层的异常需定义一个ServiceException基类,继承自RuntimeException
1
2
3
4
5
6
7
8
9
10
11
12
13
14
15
16
17
18
19
20
21
22
23
24
25
26
| package com.bang.store.service.ex;
public class ServiceException extends RuntimeException{
public ServiceException() {
super();
}
public ServiceException(String message) {
super(message);
}
public ServiceException(String message, Throwable cause) {
super(message, cause);
}
public ServiceException(Throwable cause) {
super(cause);
}
protected ServiceException(String message, Throwable cause, boolean enableSuppression, boolean writableStackTrace) {
super(message, cause, enableSuppression, writableStackTrace);
}
}
|
>
>
业务层根据应用场景定义对应具体的异常类,均需继承于ServivceException
用户在进行注册时可能会出现用户名被占用的情况,此时应抛出一个异常
定义名为UsernameOccupiedException来表明用户名占用错误
1
2
3
4
5
6
7
8
9
10
11
12
13
14
15
16
17
18
19
20
21
22
23
24
25
26
| package com.bang.store.service.ex;
public class UsernameOccupiedException extends ServiceException{
public UsernameOccupiedException() {
super();
}
public UsernameOccupiedException(String message) {
super(message);
}
public UsernameOccupiedException(String message, Throwable cause) {
super(message, cause);
}
public UsernameOccupiedException(Throwable cause) {
super(cause);
}
protected UsernameOccupiedException(String message, Throwable cause, boolean enableSuppression, boolean writableStackTrace) {
super(message, cause, enableSuppression, writableStackTrace);
}
}
|
用户数据插入过程中,由于服务器宕机、数据库宕机所引发的异常
定义名为insertException来表明由于此类问题所引起的异常
1
2
3
4
5
6
7
8
9
10
11
12
13
14
15
16
17
18
19
20
21
22
23
24
25
26
| package com.bang.store.service.ex;
public class InsertException extends ServiceException{
public InsertException() {
super();
}
public InsertException(String message) {
super(message);
}
public InsertException(String message, Throwable cause) {
super(message, cause);
}
public InsertException(Throwable cause) {
super(cause);
}
protected InsertException(String message, Throwable cause, boolean enableSuppression, boolean writableStackTrace) {
super(message, cause, enableSuppression, writableStackTrace);
}
}
|
接口设计
具体业务逻辑,接口命名建议参考IxxxService
1
2
3
4
5
6
7
8
9
10
11
| package com.bang.store.service;
import com.bang.store.pojo.User;
public interface IUserService {
void reg(User user);
}
|
实现类
实现业务接口中的业务方法,命名建议xxxSericeImpl
1
2
3
4
5
6
7
8
9
10
11
12
13
14
15
16
17
18
19
20
21
22
23
24
25
26
27
28
29
30
31
32
33
34
35
36
37
38
39
40
41
42
43
44
45
46
47
48
49
50
51
52
53
54
55
56
57
58
59
60
61
| package com.bang.store.service.impl;
import com.bang.store.mapper.UserMapper;
import com.bang.store.pojo.User;
import com.bang.store.service.IUserService;
import com.bang.store.service.ex.InsertException;
import com.bang.store.service.ex.UsernameOccupiedException;
import org.springframework.beans.factory.annotation.Autowired;
import org.springframework.stereotype.Service;
import org.springframework.util.DigestUtils;
import javax.annotation.Resource;
import java.util.Date;
import java.util.UUID;
@Service
public class UserServiceImpl implements IUserService {
@Resource
private UserMapper userMapper;
@Override
public void reg(User user) {
User isOccupied = userMapper.findByUsername(user.getUsername());
if(isOccupied!=null){
throw new UsernameOccupiedException("用户名已经被占用");
}
String password = user.getPassword();
String salt = UUID.randomUUID().toString().toUpperCase();
password = getMD5password(password,salt);
user.setSalt(salt);
user.setPassword(password);
user.setIsDelete(0);
user.setCreatedUser(user.getUsername());
user.setModifiedUser(user.getUsername());
Date date = new Date();
user.setCreatedTime(date);
user.setModifiedTime(date);
Integer rows = userMapper.insert(user);
if(rows!=1){
throw new InsertException("用户注册过程中产生了未知异常");
}
}
public String getMD5password(String password,String salt){
for(int i=0;i<3;i++){
password = DigestUtils.md5DigestAsHex((salt+password+salt).getBytes()).toUpperCase();
}
return password;
}
}
|
单元测试
创建对应的测试文件
1
2
3
4
5
6
7
8
9
10
11
12
13
14
15
16
17
18
19
20
21
22
23
24
25
26
27
28
29
30
31
| package com.bang.store.service;
import com.bang.store.pojo.User;
import com.bang.store.service.ex.ServiceException;
import org.junit.Test;
import org.junit.runner.RunWith;
import org.springframework.beans.factory.annotation.Autowired;
import org.springframework.boot.test.context.SpringBootTest;
import org.springframework.test.context.junit4.SpringRunner;
@SpringBootTest
@RunWith(SpringRunner.class)
public class UserServiceTest {
@Autowired
private IUserService iUserService;
@Test
public void reg(){
try{
User user = new User();
user.setUsername("刘备");
user.setPassword("liu123456");
System.out.println(user);
iUserService.reg(user);
System.out.println("注册成功!!!");
}catch (ServiceException e){
System.out.println(e.getClass());
System.out.println(e.getMessage());
}
}
}
|
补充项
密码明文展示存在安全隐患,利用md5加密算法,对密码进行加密再存储在数据库
常见解决方案: 串+真实password+串 -》MD5算法加密,连续加载三次
串是指:盐值,一个随机的字符串
控制层
创建响应
所有的控制层的响应应该都包含:状态码、状态描述信息、数据
所以将其分装成一个类,将这个类作为返回值返回给前端浏览器
1
2
3
4
5
6
7
8
9
10
11
12
13
14
15
16
17
18
19
20
21
22
23
24
25
26
27
28
29
30
31
| package com.bang.store.utils;
import lombok.Data;
import java.io.Serializable;
@Data
public class JsonResult<E> implements Serializable {
private Integer state;
private String message;
private E data;
public JsonResult() {
}
public JsonResult(Integer state) {
this.state = state;
}
public JsonResult(Throwable e){
this.message=e.getMessage();
}
public JsonResult(Integer state, E data) {
this.state = state;
this.data = data;
}
}
|
设计请求
依据具体的业务设计对应的请求,常见请求应该包含以下四个主题:请求地址、请求参数、请求方法、请求响应
比如针对用户注册功能
1
2
3
4
| 请求地址: /user/reg
请求参数: User user
请求方法:Post
请求响应:JsonResult<void>
|
处理请求
在控制层创建对应的实现类,借助业务层的相关接口方法,对用户的请求做出对应逻辑的处理
1
2
3
4
5
6
7
8
9
10
11
12
13
14
15
16
17
18
19
20
21
22
23
24
25
26
27
28
29
30
31
32
33
34
35
36
| package com.bang.store.controller;
import com.bang.store.pojo.User;
import com.bang.store.service.IUserService;
import com.bang.store.service.ex.InsertException;
import com.bang.store.service.ex.UsernameOccupiedException;
import com.bang.store.utils.JsonResult;
import org.springframework.beans.factory.annotation.Autowired;
import org.springframework.web.bind.annotation.RequestMapping;
import org.springframework.web.bind.annotation.RestController;
@RestController
@RequestMapping("/user")
public class UserController {
@Autowired
private IUserService userService;
@RequestMapping("/reg")
public JsonResult<Void> reg(User user){
JsonResult<Void> result = new JsonResult<>();
try{
userService.reg(user);
result.setState(200);
result.setMessage("用户注册成功");
}catch (UsernameOccupiedException e){
result.setState(4000);
result.setMessage("用户名被占用");
}catch (InsertException e){
result.setState(5000);
result.setMessage("注册时未知异常");
}
return result;
}
}
|
控制层代码优化设计
观察5.3中控制层请求处理代码逻辑,发现异常捕获部分存在较大冗余,对于业务层而言,其代码确定之后,异常类型也就可以确定,所以控制层可能捕获的异常也就可能确定,可以将异常捕获处理这部分代码剥离出来,构建一个基础类,让控制层处理请求类继承至该类
这么设计的可行性:
- Spring提供了ExceptionHandle注解,该注解可以当某种类型异常发生之后,会统一拦截到对应方法上进行处理
抽象出的基类
1
2
3
4
5
6
7
8
9
10
11
12
13
14
15
16
17
18
19
20
21
22
23
24
25
26
| package com.bang.store.controller;
import com.bang.store.service.ex.InsertException;
import com.bang.store.service.ex.ServiceException;
import com.bang.store.service.ex.UsernameOccupiedException;
import com.bang.store.utils.JsonResult;
import org.springframework.web.bind.annotation.ExceptionHandler;
public class BaseController {
public static final Integer OK=200;
@ExceptionHandler(ServiceException.class)
public JsonResult<Void> handleException(Throwable e){
JsonResult<Void> result = new JsonResult<>();
if(e instanceof UsernameOccupiedException){
result.setState(4000);
result.setMessage("用户名被占用");
} else if (e instanceof InsertException) {
result.setState(5000);
result.setMessage("注册时未知异常");
}
return result;
}
}
|
控制层注册逻辑代码简化版本
1
2
3
4
5
6
7
8
9
10
11
12
13
14
15
16
17
18
19
20
21
22
23
24
| package com.bang.store.controller;
import com.bang.store.pojo.User;
import com.bang.store.service.IUserService;
import com.bang.store.service.ex.InsertException;
import com.bang.store.service.ex.UsernameOccupiedException;
import com.bang.store.utils.JsonResult;
import org.springframework.beans.factory.annotation.Autowired;
import org.springframework.web.bind.annotation.RequestMapping;
import org.springframework.web.bind.annotation.RestController;
@RestController
@RequestMapping("/user")
public class UserController extends BaseController{
@Autowired
private IUserService userService;
@RequestMapping("/reg")
public JsonResult<Void> reg(User user){
userService.reg(user);
return new JsonResult<>(OK,"用户注册成功");
}
}
|
前端页面的开发
在注册页面编写发送请求的方法,利用事件来完成。首先根据选择器的到对应的按钮对象(比如$(选择器)),对按钮对象绑定对应的点击事件
利用异步请求(ajax技术),对后端程序发送对应的请求
ajax的使用方法,ajax函数会接受多个参数,参数类似于键值对的形式,用,分割
1
2
3
4
5
6
7
8
9
10
11
12
| $.ajax({
url: ""
,type:""
,data:""
,dataType:""
,success:function(){
}
,error:function(){
}
});
|
| 参数 |
参数功能 |
| url |
标识请求的地址,不包含参数列表 ,比如:url:http://localhost:8080/user/reg |
| type |
请求方法类型(GET、POST) ,比如: type:”POST” |
| data |
请求发送的数据,例如: data:”username=张飞&password=123456” |
| dataType |
请求传送数据数据类型,一般为json类型,比如: dataType:”json” |
| success |
服务器正常响应客户端时,会自动调用该参数对应的方法,并将服务器返回值自动装填到方法参数上 |
| error |
服务器不能够正常响应客户端时,会自动调用该参数对应的方法,并将服务器返回值自动装填到方法参数上 |
前端核心代码
1
2
3
4
5
6
7
8
9
10
11
12
13
14
15
16
17
18
19
20
21
| <script>
$("#btn-reg").click(function () {
$.ajax({
url:"/user/reg",
type:"POST",
data:$("#form-reg").serialize(),
dataType:"json",
success:function (data) {
alert(data.message)
},
error:function (xhr) {
alert("注册时产生未知错误"+ xhr.status)
}
});
});
</script>
|
 微信
微信 支付宝
支付宝